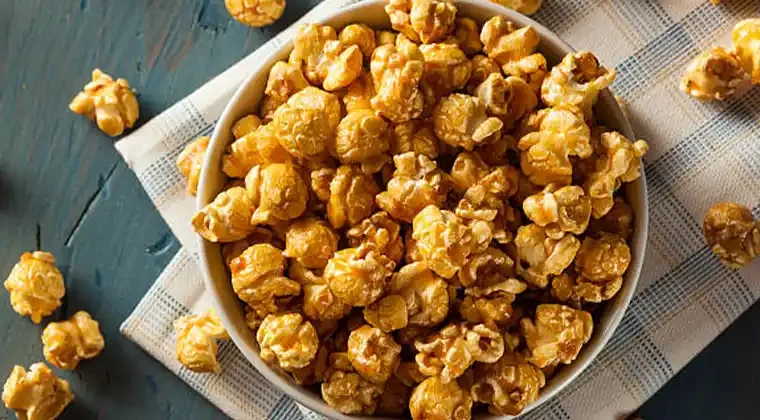
When it comes to indulgent snacks, few things compare to a big bowl of warm, sweet, crunchy caramel popcorn. Many people think you need fancy equipment or special ingredients to recreate the flavor of cinema-style popcorn at home—but there’s a simple recipe that not only rivals, but outshines what you get at the theater.
This recipe brings together basic pantry ingredients in a way that delivers rich, buttery caramel-coated popcorn that’s irresistible. It’s easy to make, doesn’t require an oven, and the result is so delicious you’ll never go back to store-bought versions.
Ingredients You’ll Need
For the caramel:
- 250 grams of white sugar
- ½ cup of milk (added in parts)
- 1 tablespoon of butter or margarine
For the popcorn:
- 1 tablespoon of butter or margarine
- 1 cup of popcorn kernels
Step 1: Make the Caramel
Start by placing 250 grams of white sugar into a non-stick pan over medium heat. Stir the sugar continuously as it begins to melt. You’ll notice it slowly turning into a smooth golden syrup. If you don’t have a non-stick pan, a regular pan works too—just keep stirring to avoid burning.
Once the sugar is completely melted and caramelized, slowly add the milk in parts (½ cup total). Do this carefully, as adding milk to hot caramel causes bubbling. Stir continuously after each addition until the mixture becomes smooth and liquid.
Now, add one tablespoon of butter or margarine and mix again until the butter melts completely. This gives the caramel its rich, velvety finish. Once everything is well combined and you have a smooth caramel sauce, turn off the heat and set the pan aside. This will be your popcorn coating.
Step 2: Pop the Corn
In a large pot with a lid (preferably aluminum), melt 1 tablespoon of butter or margarine over high heat.
Once the butter has melted, add 1 cup of popcorn kernels and stir well so the kernels are evenly coated with butter. Cover the pot with the lid, keeping the heat on high. As the kernels begin to pop, gently shake the pot from time to time to avoid burning.
When the popping slows down significantly (with several seconds between pops), remove the pot from the heat. Let it sit for a minute to ensure all popping is finished.
Step 3: Coat with Caramel
Transfer the popped popcorn into a large plastic or glass container with a lid.
Pour half of the caramel sauce over the popcorn, then close the lid and shake well to distribute the caramel evenly. Open the container and pour the remaining caramel on top. Close the lid again and shake vigorously until all the popcorn is coated.
If the caramel has started to harden, you can reheat it gently on low heat just until it becomes pourable again.
Tips for Perfect Results
- Use fresh popcorn kernels for the best pop and texture.
- Don’t skip the shaking step—it helps coat each piece evenly without breaking the popcorn.
- If your caramel gets too thick, a quick trip back to the stove on low heat can save it.
- Want to add a twist? Sprinkle a pinch of salt into the caramel for that classic sweet-and-salty flavor combo.
Why This Popcorn is Better Than the Movies
Movie theater popcorn may have the ambiance, but this version has:
- Richer caramel flavor
- Fewer preservatives
- Customizable ingredients
- Lower cost
- The satisfaction of homemade goodness
Best of all, this recipe is simple enough for beginners and quick enough to whip up for a spontaneous movie night, gathering, or just a sweet treat on a cozy day.
Storage Tips
If you don’t eat it all in one sitting (unlikely!), you can store your caramel popcorn in an airtight container at room temperature for up to 3 days. Avoid refrigerating—it can make the popcorn soggy.
Final Thoughts
There’s something special about making your own caramel popcorn from scratch. The smell alone will draw everyone into the kitchen, and the taste is even more rewarding. Whether you’re planning a movie marathon, need a homemade gift idea, or just crave something crunchy and sweet—this caramel popcorn recipe is guaranteed to be a crowd-pleaser.
Disclaimer: Always handle hot caramel with care to avoid burns, and never leave sugar heating on the stove unattended.
Inspired by this? Share the article with your friends!