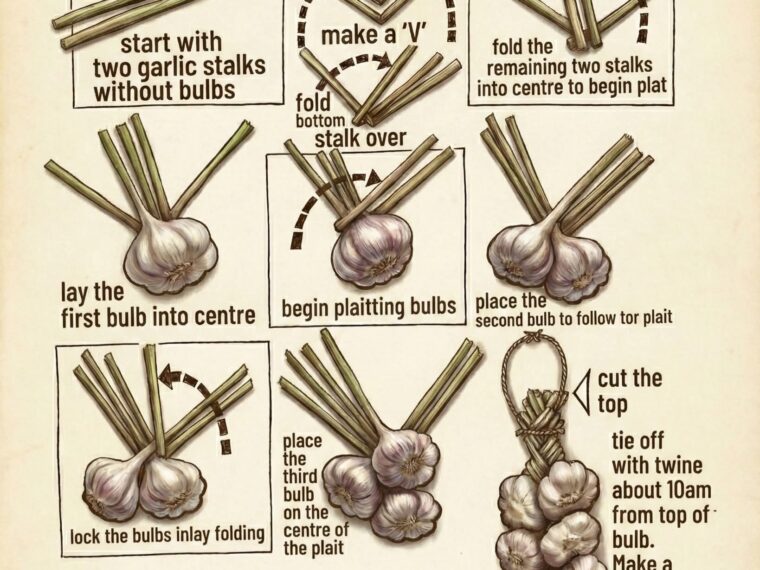
🧄 Turn Your Harvest into Art: The Lost Art of the Garlic Braid (Step-by-Step Guide)
Have you ever wondered how farmers make those beautiful garlic plaits that hang in country kitchens? I found this vintage guide from Marlborough that breaks it down perfectly.
We tested the logic behind this diagram, and here is the “real info” you need to make this work, because there are two secrets the image doesn’t tell you outright!
⚠️ CRITICAL RULES BEFORE YOU START:
Use SOFTNECK Garlic Only: This is the most important rule. You cannot braid Hardneck garlic (the kind with the stiff woody stem in the middle); it will snap. You need Softneck varieties (like Silverskin or Artichoke) which have flexible leaves for stems.
The “Curing” Sweet Spot: Don’t braid fresh green garlic (it shrinks and loosens as it dries) and don’t braid bone-dry garlic (the stems will crumble). You want the “leathery” stage—usually about 1-2 weeks after harvest when the stems are half-green/half-brown and pliable.
📋 THE METHOD (Based on the Wairau Products Diagram)
This specific technique is brilliant because it starts with empty stalks to create a strong hanging loop, rather than just mashing bulbs together at the top.
Step 1: Create the Foundation Grab two garlic stalks that have had the bulbs removed (or use some soaked raffia/straw if you don’t have spare stalks).
Diagram Tip: Cross them to make a “V” shape. Fold the bottom stalk over the join to lock it, then fold the remaining ends into the center to begin a simple plait. This creates your “handle.”
Step 2: Add the First Bulb (The Anchor) Lay your first full garlic bulb right into the center of the plait you just started.
Technique: Treat the bulb’s stem as part of the center strand of your braid.
Step 3: The “French Braid” Pattern This is exactly like French braiding hair.
Place a bulb: Add a bulb to the side (left or right).
Join the stem: Lay its stem alongside the existing strand on that side.
Cross over: Bring that combined strand into the middle.
Diagram Tip: The image stresses “Lock the bulbs in by folding.” This means pulling the stem tight across the bulb’s neck to secure it so it doesn’t flop around.
Step 4: Alternate & Build Place the next bulb on the opposite side, join the stems, and cross over. Then place a bulb in the center.
Pattern: Left, Right, Center, Left, Right, Center. Keep the bulbs resting snugly on top of each other.
Step 5: The Finish Once you run out of bulbs or the braid is heavy enough:
Continue braiding the empty stems for a few inches.
Tie off: As shown in the bottom right of the diagram, use twine to tie it off tight about 10cm from the last bulb.
Loop it: Make a loop with the twine for hanging.
Pro Tip: Trim the messy tuft of stems at the top for a neat finish (as seen in the “Cut the top” instruction).
Why do this? Aside from looking incredible, this is actually the best way to store softneck garlic. It allows 360-degree airflow around the bulbs, preventing rot and helping them last up to 6-9 months!
Save this image for your next harvest! 🌱