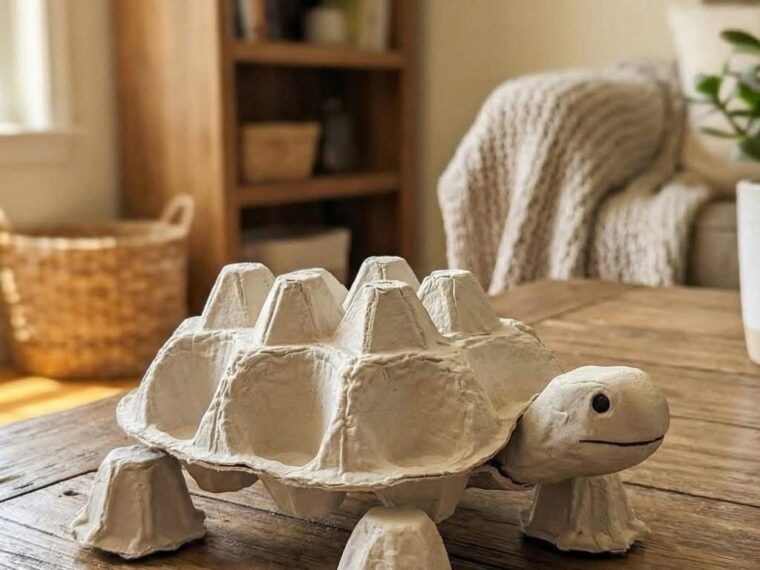
🐢 Cutest DIY Turtle Made From Egg Cartons — Step-by-Step Guide
Turn an ordinary egg carton into a charming little turtle! This craft uses mostly recycled materials and only a few basic supplies, making it ideal for rainy-day activities, school art projects, or upcycling fun with the kids.
Difficulty: Easy
Time: 20–40 minutes (depending on drying/painting time)
Ages: 4+ with adult supervision for cutting and hot-glue use
✂️ Materials You’ll Need
- 1 recycled paper egg carton (cardboard type works best)
- Acrylic paints (green, brown, black, white, or colors of your choice)
- Paintbrushes (small and medium)
- Scissors or craft knife (adult use)
- Glue (hot glue for strength — adult use — or strong craft glue)
- Pencil and marker (black)
- Optional: googly eyes, small beads, pipe cleaners, sequins, or craft foam for decoration
- Optional: varnish or Mod Podge to seal the paint
♻️ Prep: Clean & Gather
- Rinse and dry the egg carton if it was dirty; let it fully air dry.
- Set up a work surface with newspaper or a craft mat.
- Gather paints, brushes, and glue.
🐢 Step-by-Step Instructions
Step 1 — Cut Out the Shell
- Take the egg carton and cut out one of the “cups” with about 3–4 adjacent cups still attached so it forms a rounded dome shape.
- For a small turtle, 3 cups in a semicircle work well. For a larger turtle, use 4–5 cups.
- Trim the edges so the dome looks smooth and shell-like.
Step 2 — Make the Turtle’s Body (Under-Shell)
- From the remaining carton, cut a flat oval or rounded rectangle to serve as the body/base. This piece will sit under the shell and hold legs, head, and tail.
- If you prefer a 3D body, use another small cup and cut it slightly to shape a belly.
Step 3 — Cut Legs, Head & Tail
- Cut four short, rounded shapes for the legs (like little ovals).
- Cut a slightly longer oval for the head. You can add a small notch where the mouth will be.
- Cut a small triangle or tapered strip for the tail.
Step 4 — Assemble the Turtle
- Position the shell (cup dome) on top of the body/base to find the best placement.
- Glue the legs onto the underside of the shell or onto the body so the turtle can “stand” — two in the front, two in the back.
- Glue the head at the front and the tail at the back. Use hot glue for quick setting (adult only) or a strong craft glue and allow longer drying time.
- If you want the shell to be removable, glue just the edges or use a small strip of Velcro.
Step 5 — Paint the Turtle
- Prime the shell and body with a base coat of paint (light green or brown works well). Let dry.
- Paint the shell pattern: try darker hexagons, spirals, or mosaic shapes. You can outline patterns with a thin black marker once paint is dry.
- Paint the legs, head, and tail a complementary color.
- Add eyes (painted white with black pupils) or glue on googly eyes for cuteness.
- Add small details: rosy cheeks, a smiling mouth, or freckle spots.
Step 6 — Add Finishing Touches
- Once paint is fully dry, optionally seal with a coat of Mod Podge or clear varnish to protect the paint and add a slight shine.
- Glue on fun decorations: sequins, tiny beads, or a ribbon bow for a festive look.
- If you want a more tactile shell, glue on small pebbles or pieces of colored paper to create a mosaic.
🎨 Creative Variations & Ideas
- Mini Turtle Family: Make three sizes (small, medium, large) to create a turtle family.
- Fairy Garden Turtle: Paint the shell with glow-in-the-dark paint and place in a potted plant scene.
- Magnet Turtles: Glue a small craft magnet to the bottom for fridge decor.
- Pincushion Turtle: Use a foam ball for the shell and cover with fabric, then attach the egg-carton base for a sewing room pincushion.
- Nature Turtle: Glue moss and small twigs to the shell for a woodland look.
✅ Safety Tips
- Always supervise kids when using scissors, craft knives, or hot glue.
- Use non-toxic paints labeled safe for children if kids are painting.
- Let glue and paint fully dry before giving the toy to a young child.
💡 Helpful Tricks
- If your egg carton is foam/plastic, swap to cardboard if you want a painted, natural look. Cardboard takes paint and glue better.
- To make legs sturdier, double up the leg pieces by gluing two together.
- For a smoother shell finish, prime with a quick wash of watered-down white paint before your base color.
🎁 Gift & Display Ideas
- Place your turtle on a windowsill or bookshelf as a cute eco-decoration.
- Wrap a set of little turtles in a clear bag with raffia as a handmade gift.
- Use small turtles as place card holders for a nature-themed party (write guests’ names on a tiny tag).
🌱 Why This Craft Is Great
- Reuses materials and reduces waste.
- Encourages creativity in kids and adults.
- Quick to make — great for parties, classrooms, and rainy afternoons.
- Results in a charming keepsake or practical item (magnet/pincushion).