🎄 DIY Cardboard Christmas Tree: How to Make One Step by Step
Looking for a creative, eco-friendly, and budget-friendly way to decorate for Christmas? A DIY cardboard Christmas tree is the perfect solution. It’s easy to make, fun for the whole family, and a great way to recycle cardboard boxes you already have at home.
In this step-by-step guide, you’ll learn exactly how to create your own cardboard Christmas tree—from materials to decorating ideas.
Why Make a Cardboard Christmas Tree?
- ♻️ Eco-friendly and recyclable
- 💰 Very low cost
- 👨👩👧 Fun family activity
- 🏠 Perfect for small spaces
- 🎨 Fully customizable
Whether you live in an apartment, want a child-safe tree, or love DIY crafts, this project is ideal.
Materials You Will Need
- Large cardboard boxes (corrugated works best)
- Pencil or marker
- Ruler or measuring tape
- Craft knife or scissors
- Hot glue gun or strong glue
- Green paint (optional)
- Paintbrush or sponge
- Decorations (lights, paper ornaments, tinsel, stickers)
- Star or topper (optional)
Step 1: Prepare the Cardboard
- Flatten your cardboard boxes.
- Remove any tape or staples.
- Lay the cardboard on a flat surface.
👉 Tip: The thicker the cardboard, the sturdier your tree will be.
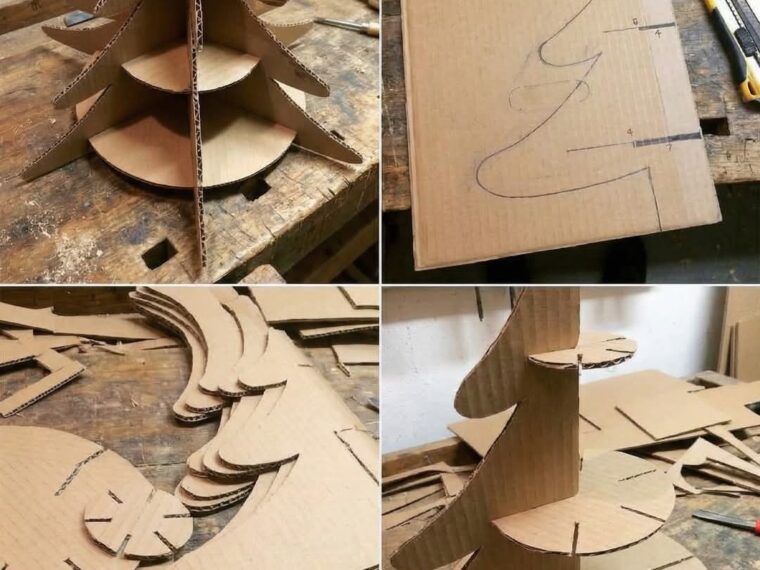
Step 2: Draw the Tree Shape
- Use a pencil to draw a large triangle on the cardboard.
- This will be one side of your tree.
- Draw two identical triangles for a flat tree or four for a 3D version.
For a more realistic look, add zigzag edges to imitate pine branches.
Step 3: Cut Out the Pieces ✂️
- Carefully cut along the lines using scissors or a craft knife.
- If children are helping, let adults handle the cutting.
Make sure all pieces are the same size.
Step 4: Create the Base
Option A: Flat Tree (Wall or Corner)
- Simply glue the triangle to a wall or sturdy backing.
Option B: Freestanding 3D Tree
- Cut a slit from the top to the center of two pieces.
- Cut a slit from the bottom to the center of the other two pieces.
- Slide the pieces together to form a cross shape.
This creates a stable, standing tree.
Step 5: Strengthen the Tree
- Use hot glue at the joints.
- Add a small cardboard base if needed.
- Let it dry completely.
Step 6: Paint the Tree 🎨 (Optional)
- Paint the tree green or any color you like.
- You can also leave it natural for a rustic look.
- Let it dry before decorating.
👉 Tip: Use sponge painting for a textured effect.
Step 7: Decorate Your Cardboard Christmas Tree ✨
Now comes the fun part!
Decoration ideas:
- Paper snowflakes
- Handmade cardboard ornaments
- String lights (LED only for safety)
- Stickers or drawings
- Tinsel or garlands
- A cardboard or paper star on top
You can even write holiday messages or draw designs.
Safety Tips
- Use LED lights only
- Avoid real candles
- Supervise children with scissors and glue
- Keep away from heat sources
Creative Variations
- 🎁 Mini tabletop cardboard tree
- 🧒 Kid-decorated tree with crayons
- 🌿 Minimalist white or kraft paper style
- 🎨 Painted theme tree (gold, red, snow-white)
Final Thoughts
A DIY cardboard Christmas tree is more than a decoration—it’s a fun holiday experience that encourages creativity, recycling, and family bonding. With simple materials and a little imagination, you can create a unique Christmas centerpiece that everyone will admire.
Disclaimer
This project is for decorative purposes only. Always follow safety guidelines when using tools or lights.