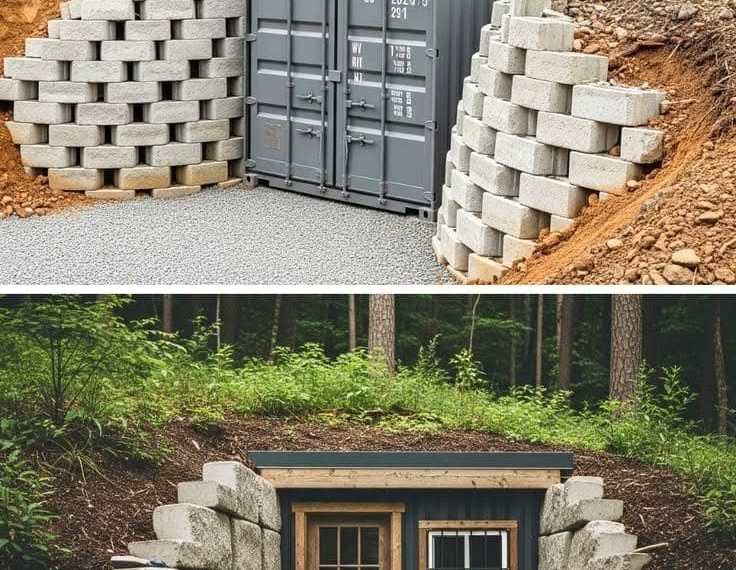
🚜 How to Build a Shipping Container Root Cellar: A Smart Way to Store Food Naturally
If you’re looking for a reliable way to store food year-round without relying on electricity, a shipping container root cellar might be the perfect solution. With their durable steel walls and solid structure, shipping containers can be transformed into underground storage spaces that naturally keep your fruits, vegetables, and preserves fresh for months.
Root cellars have been used for centuries, but with modern materials like shipping containers, building one has become easier, faster, and more efficient. Here’s how to do it step-by-step.
🧱 Why Use a Shipping Container?
Shipping containers are designed to survive harsh ocean conditions, so they’re:
- Watertight and rust-resistant.
- Strong and durable, with a long lifespan.
- Easy to modify for ventilation, insulation, and shelving.
- Affordable compared to constructing a full underground cellar from scratch.
When properly installed, a buried shipping container can maintain a steady temperature between 0°C and 10°C (32°F to 50°F) — ideal for storing root vegetables, canned goods, and even wine.
⚙️ Materials You’ll Need
- 1 shipping container (20-foot containers are most common)
- Excavator or backhoe (for digging)
- Gravel or crushed stone (for drainage)
- Waterproof sealant or tar (for coating the container)
- PVC pipes and fans (for ventilation)
- Insulation panels or spray foam (for thermal stability)
- Plywood or framing materials (for shelves and interior finishing)
- Moisture barrier and vapor seal (to prevent rust and condensation)
🪓 Step-by-Step Guide to Building a Shipping Container Root Cellar
Step 1: Choose the Right Location
Pick a well-drained area away from flood zones or standing water. A shady hillside is ideal since it helps regulate temperature naturally.
Step 2: Prepare the Ground
Use an excavator to dig a pit large enough to fit your container. Leave at least 2–3 feet of clearance on all sides and underneath for drainage and waterproofing.
Add a 12-inch layer of gravel or crushed stone at the bottom for proper water flow.
Step 3: Waterproof the Container
Apply a bitumen-based or rubberized waterproof sealant to the exterior of the container. Pay special attention to seams, welds, and corners. This coating will protect the steel from corrosion once buried.
For extra protection, you can also wrap the container in a plastic vapor barrier or heavy-duty waterproof membrane.
Step 4: Install Ventilation
Good airflow prevents mold and keeps humidity balanced.
- Install one PVC pipe intake near the floor (for cool air) and one exhaust pipe near the ceiling (for warm air).
- Ensure the pipes extend above ground level and are covered with mesh to keep insects and debris out.
Optionally, add a solar-powered fan to help circulate air naturally.
Step 5: Add Insulation
Although the ground provides natural insulation, adding extra protection helps maintain consistent temperatures.
- Line the inside walls and ceiling with foam boards or spray insulation.
- Cover with plywood or paneling to prevent moisture exposure.
Step 6: Build an Entrance
You can use the container’s original door, but for better insulation, build a small entryway or access tunnel with a sturdy door and weather stripping.
This double-door system helps reduce temperature loss when entering.
Step 7: Backfill Carefully
After waterproofing and ventilation installation, slowly backfill around the container using soil and sand. Avoid using heavy clay that holds moisture.
Leave the roof slightly exposed or build a small shed or camouflage cover to protect the entrance from rain and snow.
Step 8: Add Shelving and Finishing Touches
Inside, install wooden or metal shelves to hold produce, jars, and canned goods.
Keep airflow space between walls and stored items to avoid moisture buildup.
🥕 What You Can Store in a Root Cellar
Your shipping container root cellar is ideal for long-term storage of:
- Root vegetables (potatoes, carrots, beets, onions, garlic)
- Apples, pears, and squash
- Homemade preserves and canned goods
- Wine, cheese, or fermented foods
With proper ventilation and organization, some foods can last for several months to over a year without refrigeration.
🌡️ Tips for Optimal Conditions
- Maintain humidity between 85–95% for most vegetables.
- Keep temperature steady between 0–10°C (32–50°F).
- Check regularly for condensation and mold — good ventilation prevents this.
- Label shelves and rotate stock regularly to avoid spoilage.
🏡 Final Thoughts
Building a shipping container root cellar is a smart, sustainable, and cost-effective way to preserve your harvest naturally. It combines the old-world wisdom of underground storage with modern materials that make it durable and low-maintenance.
Once complete, you’ll have a secure, eco-friendly storage space that keeps your food fresh all year — even during power outages.
If you care about self-sufficiency, emergency preparedness, or homesteading, this project is one worth adding to your list!