Avocados are among the most popular fruits in the world, loved for their creamy texture and nutritional benefits.
But beyond eating them, there’s another joy hidden inside every avocado – the seed.
That hard pit, often discarded, can actually be grown into a beautiful plant and, with patience, even a fruiting tree.
Growing an avocado from seed is simple, inexpensive, and surprisingly fun. While commercial orchards rely on grafted trees for consistent fruit, hobby gardeners grow from seed for the experience, the decorative value, and the satisfaction of nurturing life from what was once kitchen waste.
Why Try Growing Avocado from Seed?
There’s something deeply rewarding about turning a leftover seed into a living plant. Avocado pits are large, easy to handle, and resilient, making them an excellent beginner project for kids and adults alike.
Even if your tree never produces fruit, it will grow into an attractive indoor plant with glossy leaves that brighten up any room.
And for those who stay committed, a seed-grown avocado tree may eventually bear fruit after several years.
Preparing the Seed
Start with a ripe, healthy avocado. Remove the seed carefully without cutting into it, then rinse it under warm water to remove any remaining flesh.
Pat it dry gently. You’ll notice the pit has a pointy end and a flat, slightly broader end.
The pointy side is where the stem will emerge, while the flat side will produce roots. Knowing which end is which is important for both methods.
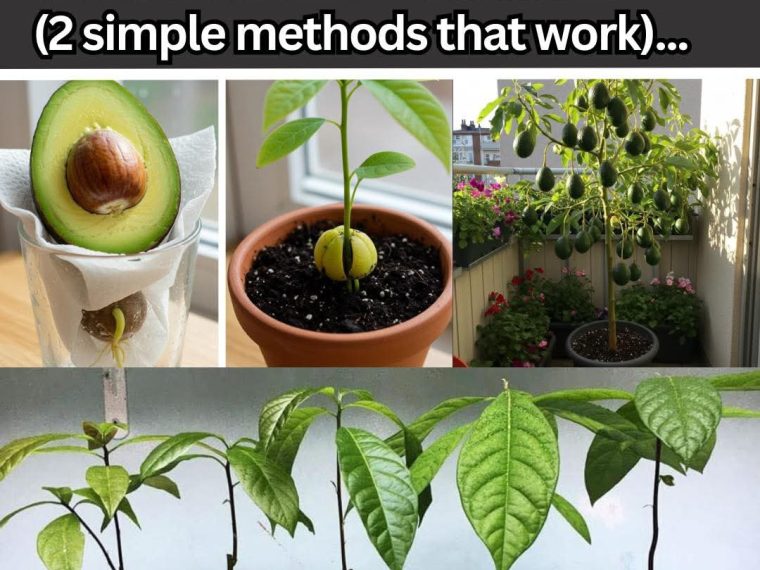
Method 1: The Classic Water Method
The water method is the most popular because it’s fun and educational. You suspend the avocado pit over water and watch as it cracks open, sends down roots, and pushes up a green shoot.
For beginners or families with children, this method is ideal.
What You’ll Need
- 1 ripe avocado pit
- 3–4 sturdy toothpicks
- A clear glass or jar (tall enough to hold the pit without tipping)
- Fresh, room-temperature water
Step-by-Step Instructions
1. Prepare the Seed
- Rinse the pit gently under lukewarm water.
- Don’t peel away the brown skin (seed coat) – it protects the inner seed.
- Identify the top (pointy end) and bottom (flat end). Roots emerge from the bottom.
2. Insert Toothpicks
- Push 3–4 toothpicks into the pit around its middle.
- Angle them slightly downward so the base dips comfortably into water.
- Space them evenly so the pit balances securely.
3. Suspend Over Water
- Rest the toothpicks on the rim of a glass, leaving the bottom half submerged.
- Keep the top exposed to air.
- Use a narrow glass for stability.
4. Provide Proper Conditions
- Place in a warm, bright location with indirect sunlight.
- Change the water every 2–3 days to prevent bacterial growth.
- Always keep the bottom covered in water.
5. Sprouting Timeline
- Weeks 2–4: Seed coat begins to crack.
- Weeks 4–6: A root pushes down into the water.
- Weeks 6–8: A stem emerges from the top.
- Weeks 8–12: First leaves appear.
Patience is key – some pits sprout faster, while others may take 8–10 weeks.
6. Preparing for Soil
- Once the stem reaches 6–8 inches, prune it back to about 3 inches. This encourages stronger branching.
- When roots are 2–3 inches long and plentiful, transfer the seedling to soil.
Troubleshooting the Water Method
- Mold on Seed: Scrape off gently and replace water more often.
- No Sprout After 10 Weeks: The seed may be non-viable. Try another pit.
- Weak, Thin Stem: Move to brighter light or use a grow light.
- Rotten Roots: Caused by stagnant water. Always refresh water regularly.
Pros and Cons of Water Method
Pros
- Fascinating to watch growth stages.
- Great for kids, classrooms, or beginners.
- Easy to identify viable vs. non-viable seeds.
Cons
- Higher risk of mold or root rot if neglected.
- Roots are fragile during transplanting.
- Requires frequent water changes.
Transplanting and Potting
If you begin with the water method, you’ll eventually need to move your seedling to soil. Select a pot at least six inches wide with good drainage.
Fill it with a light, loamy mix, enriched with perlite or sand to help aeration. Place the seedling so that the top half of the pit is above the soil surface. Water thoroughly and keep the pot in a sunny, sheltered spot.
As the tree grows, repot it into larger containers every year or two. Each move gives the roots space to expand and prevents the plant from becoming root-bound.
Caring for Your Avocado Plant
Avocados thrive in bright, indirect sunlight. Indoors, a south-facing window is ideal, and if natural light is limited, a grow light can supplement.
They prefer consistent warmth, with temperatures between 60–85°F. Protect the plant from frost, and in colder regions, bring it indoors during winter.
Watering is a balance. The soil should stay moist but never soggy, as avocado roots are prone to rot. Allow the top inch of soil to dry before watering again. Overwatering is the most common mistake new growers make.
Begin feeding your plant with a balanced, water-soluble fertilizer after three or four months. In the growing season, a formula higher in nitrogen will support leafy growth.
Pruning is also essential – pinch back the growing tips when the plant reaches six to eight inches to encourage branching and prevent leggy growth.
Will It Bear Fruit?
One of the most common questions is whether a seed-grown avocado will produce avocados. The honest answer is: it might, but it takes time.
Trees grown from seed can take anywhere from five to thirteen years to flower, and even then, the fruit may not match the avocado you ate. Commercial growers avoid this uncertainty by grafting.
For home gardeners, though, fruit is not the only reward.
The process itself – nurturing a seed into a lush tree – is often the most satisfying part. And with proper care, there’s always the chance your patience will eventually be rewarded with homegrown avocados.
Troubleshooting Common Problems
No sprout after weeks: Be patient. Some seeds take longer. Ensure warmth and keep conditions moist but not soggy.
Leaves turning yellow: This may indicate overwatering. Let the soil dry out slightly before watering again.
Leggy growth: Not enough light. Move the plant closer to a sunny window or supplement with a grow light.
Root rot: Usually caused by poor drainage. Repot in fresh soil and make sure pots have drainage holes.
Growing an avocado from seed is one of the easiest and most satisfying home gardening projects. With just a little care and patience, you can transform a kitchen leftover into a thriving plant.
Whether you choose to start your seed in water or soil, the result will be a beautiful green companion that grows year after year.
Method 2: The Direct Soil Method
TO CONTINUE READING THE ARTICLE PLEASE SEE PAGE 2