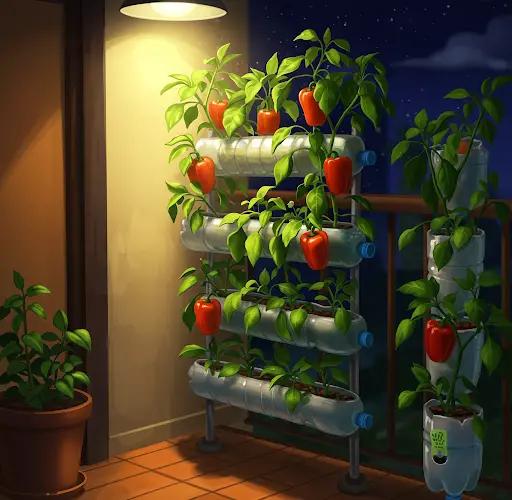
Urban gardening has grown rapidly in popularity, and for good reason—it allows people to grow their own food in small spaces with minimal cost. One creative and highly productive method is growing bell peppers vertically on walls using recycled plastic bottles. This technique not only saves space but also transforms empty walls into lush, productive gardens.
With this guide, you’ll learn how to grow bell peppers using simple materials, achieve high yields, and enjoy pesticide-free vegetables right at home.
Why Grow Bell Peppers on the Wall?
Bell peppers (also called sweet peppers or capsicum) are rich in vitamin C, antioxidants, and fiber. They’re relatively easy to grow, even for beginners. By using plastic bottles and vertical wall space, you can:
- Save ground space
- Upcycle waste materials
- Grow more plants in limited areas
- Create an attractive green wall
- Reduce watering needs with smart soil mixes
Whether you live in an apartment or have a small backyard, this is a sustainable, cost-effective growing method.
Materials You’ll Need
- 1.5 or 2-liter plastic bottles (cleaned and dried)
- Bell pepper seeds or seedlings
- Sharp knife or scissors
- Nail or screwdriver (for making drainage holes)
- Twine, wire, or wall hooks for hanging
- Potting mix (details below)
- Organic fertilizer or compost
- Mulch material (dry leaves, coconut husk, etc.)
Step-by-Step Guide to Growing Bell Peppers on the Wall
1. Preparing the Plastic Bottles
Start by cutting an opening in each plastic bottle. You can cut off the top third to create a wide opening for planting, or cut a horizontal window on one side of the bottle (leaving enough structure to hold soil).
Poke 3–4 small holes in the bottom of each bottle to allow drainage.
If hanging vertically, make holes on the sides near the top to attach twine or wire. Bottles can be hung vertically in rows or mounted to a wall using nails or brackets.
2. Choosing the Right Soil Mix
A loose, well-draining soil mix is essential. A good DIY mix includes:
- 40% garden soil
- 30% compost or aged manure
- 20% cocopeat or sand (for water retention and aeration)
- 10% wood ash or neem cake (for pest control and minerals)
This mix ensures healthy root growth and retains enough moisture while preventing waterlogging.
3. Sowing or Transplanting
If starting from seed:
- Soak seeds for 6–8 hours to speed up germination
- Start in seed trays or small cups
- Germination takes 7–14 days
Once seedlings have 4–6 true leaves, transplant them into the prepared bottles. Plant one seedling per bottle to ensure sufficient space and nutrients.
If using purchased seedlings, plant them directly into the containers, being careful not to damage the roots.
4. Positioning on the Wall
Choose a sunny wall that gets at least 6 hours of sunlight daily. South- or west-facing walls are ideal. Use strong twine, metal brackets, or hanging systems to support the weight of the bottles, soil, and growing plants.
Leave enough space between bottles for air circulation and light exposure.
5. Watering and Mulching
Water the plants every 2–3 days, or when the top inch of soil feels dry. Early morning is the best time to water.
To reduce evaporation and maintain soil moisture, apply mulch around the base of each plant. Use dry leaves, straw, coconut fiber, or rice husks.
Tip: If bottles are stacked vertically, allow excess water from the top bottle to drain into the lower ones, saving water and effort.
6. Fertilizing Naturally
Feed your bell pepper plants every 2–3 weeks with organic fertilizers such as:
- Compost tea
- Crushed eggshells for calcium
- Banana peel or wood ash for potassium
- Diluted cow dung or vermiwash
Avoid high-nitrogen fertilizers, which encourage leaf growth at the expense of fruiting.
7. Supporting the Plants
As the plants grow taller and start bearing fruit, they may become top-heavy. Use soft ties or garden clips to support the stems and prevent breakage. This is especially important for wall gardens, where space is tight.
8. Pest and Disease Management
Common pests include aphids, mealybugs, and whiteflies. Use natural remedies such as:
- Neem oil spray every 10–14 days
- Garlic-chili spray
- Soap water spray for soft-bodied pests
Ensure proper spacing and ventilation to prevent fungal diseases. Avoid overwatering to reduce root rot risk.
Harvesting Bell Peppers
Bell peppers typically mature in 70–90 days from transplanting. Harvest when the peppers are firm and reach the desired size and color (green, red, yellow, or orange, depending on variety).
Use scissors or a sharp knife to cut the fruit cleanly. Regular harvesting encourages the plant to produce more peppers.
Final Tips
- Choose compact or dwarf pepper varieties for small bottles or tighter spaces
- Rotate crops seasonally to maintain soil health
- Reuse bottles each season by refreshing the soil and compost
- Keep an eye on moisture during dry or windy periods
Conclusion
Growing bell peppers on your wall using recycled plastic bottles is not only eco-friendly but also highly productive. With minimal cost and space, you can create a green vertical garden that yields fresh, chemical-free peppers for your kitchen. Start small, experiment with your setup, and watch your wall turn into a colorful, fruit-filled harvest zone.


