Step 2: Add Soil
Fill each cup almost to the top with a fine, well-draining seed-starting mix. Carrot seeds are tiny and germinate best in light, fluffy soil.
Avoid heavy garden soil – it compacts too easily and may stop roots from developing straight. Leave a little space at the top so water doesn’t spill out when misting.
Step 3: Sow the Seeds
Drop 2–3 carrot seeds into each cup. Cover them with a very thin layer of soil, about ¼ inch, and press gently.
Carrots need light to germinate, so don’t bury them too deeply.
Step 4: Water Carefully
Mist the surface gently with a spray bottle so you don’t wash the seeds away. The soil should feel moist but never soggy.
From now until germination, mist regularly to keep the surface from drying out.
Step 5: Create a Mini Greenhouse
Cover the egg tray with plastic wrap or place it inside a clear bag to trap humidity. This creates a greenhouse effect that helps seeds sprout faster.
Make a few small holes in the plastic to allow air circulation and prevent mold.
Step 6: Germination & Care
Carrot seeds take 1–3 weeks to germinate, depending on temperature. Place your tray in a warm, bright location with indirect light until you see green sprouts.
Once the seedlings appear, move them to a sunny windowsill or under a grow light for at least 6 hours of light per day.
When the seedlings develop their first true leaves, thin them by snipping weaker seedlings at the base with small scissors, leaving one strong plant per cup.
Step 7: Transplanting
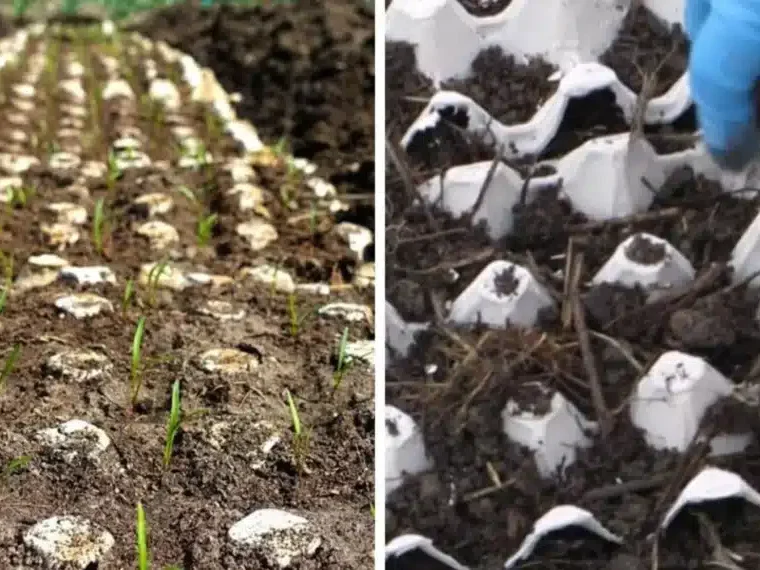
When seedlings are 2–3 inches tall and have several leaves, it’s time to transplant.
Prepare your garden bed by loosening the soil at least 8–10 inches deep and removing any stones – carrots need loose soil to grow straight.
With cardboard trays: Simply cut each cup apart and plant it directly into the soil. The cardboard will decompose naturally.
With plastic trays: Gently push seedlings out of each cup, being careful not to damage the delicate taproots.
Plant seedlings 2–3 inches apart in rows 12 inches apart. Water them in well.
Extra Tips for Success
- Choose the Right Varieties: Short or round carrots like ‘Paris Market’ or ‘Thumbelina’ are easier to start in trays and transplant successfully.
- Temperature: Ideal soil temperature for carrot germination is 60–70°F (15–21°C).
- Moisture Management: Carrots need consistently moist soil, especially in the first 2 weeks after transplanting. Dry soil causes poor germination and cracked roots.
- Thinning: Don’t skip thinning in the garden. Crowded carrots won’t develop proper roots.
- Succession Planting: Sow new egg trays every 2–3 weeks to enjoy a steady harvest all season.
Why Carrots Love This Method
Carrots are notorious for being tricky to start directly in the garden – they germinate slowly, and if the soil dries out even once, the seeds may fail.
Using egg trays gives you more control over temperature and moisture during this critical stage.
Once transplanted, seedlings already have a head start, which leads to stronger roots and earlier harvests.
Planting carrots in egg trays is an easy, affordable, and eco-friendly way to grow your own vegetables, even in small spaces.
By recycling everyday materials and giving your seeds the right conditions to sprout, you set yourself up for success.
With just a little care, your seedlings will be ready for transplanting into the garden or larger containers, where they can grow into sweet, crunchy carrots.