Materials You’ll Need
- Portland cement or quick-set concrete mix
- Large leaf (like rhubarb, hosta, or gunnera) or a bowl as a mold
- Large mixing bucket
- Water
- Mixing stick or trowel
- Cooking spray or petroleum jelly (mold release)
- Rubber gloves
- Mask (to avoid inhaling cement dust)
- Wire mesh or chicken wire (optional for reinforcement)
- Sand or soil for shaping (if using leaves)
Step-by-Step Instructions
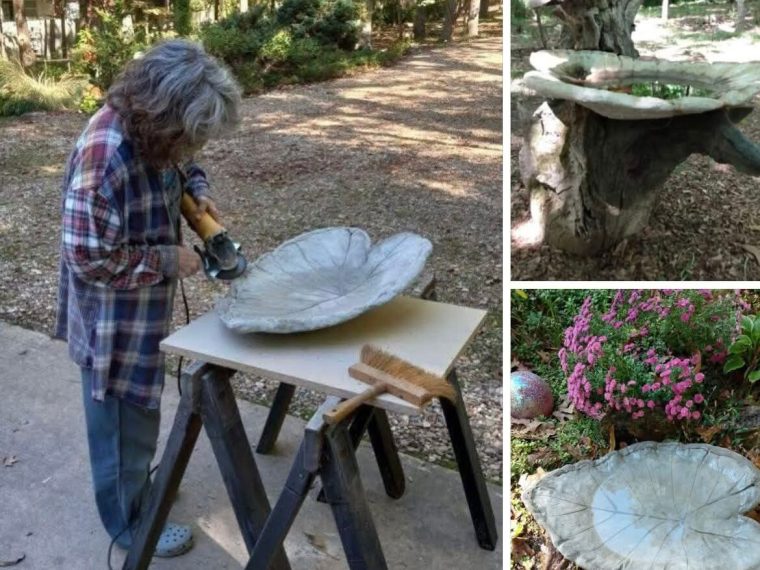
1. Choose Your Mold
- Leaf Method: Pick a large leaf with strong veins — this gives a natural texture to the bath.
- Bowl Method: Use two nesting bowls (outer bowl for shape, inner bowl for creating the basin).
2. Prepare Your Workspace
- Work outside or in a well-ventilated area.
- Lay down a tarp or old plastic sheet to protect the surface.
3. Mix the Cement
- Put on gloves and mask.
- In a bucket, mix cement and water according to package instructions until it’s a thick, smooth consistency — like peanut butter.
- If desired, add wire mesh into the mix for extra strength.
4. Shape the Bird Bath
Leaf Method:
- Make a mound of damp sand or soil.
- Place the leaf face-down over the mound.
- Spread cement mixture over the back of the leaf, about ½–1 inch thick.
Bowl Method:
- Coat bowls with cooking spray or petroleum jelly.
- Fill outer bowl with cement mix.
- Press smaller bowl into the center to create the basin. Add weights in the top bowl to hold shape.
5. Let It Cure
- Cover with plastic to retain moisture and let it cure slowly.
- Wait at least 24–48 hours (or longer in cooler weather).
6. Remove the Mold
- Gently peel away the leaf or remove the bowls.
- Smooth rough edges with sandpaper if needed.
7. Finish & Seal
- Optionally paint with non-toxic outdoor paint.
- Seal with a bird-safe concrete sealer to extend life.
8. Install & Enjoy
- Place in your garden in a shaded spot.
- Fill with fresh water daily for happy, visiting birds.