What You’ll Need:
Ingredients (Stovetop Method – fast):
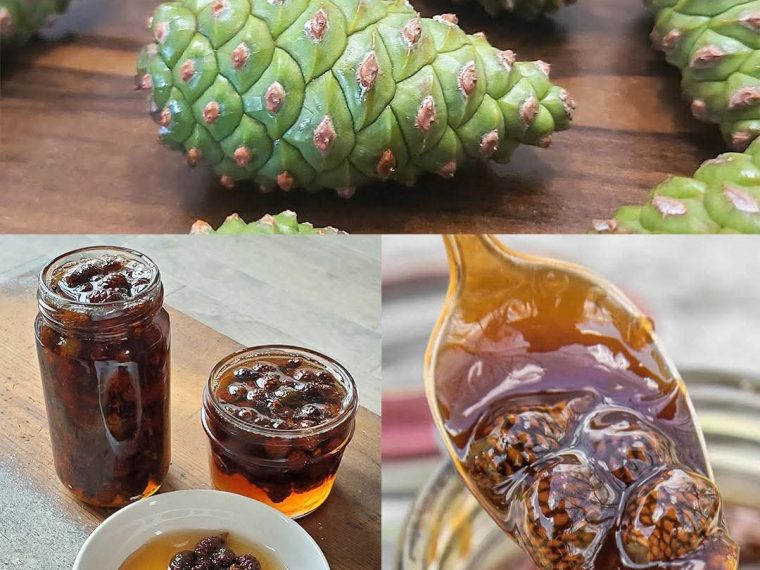
- 500 g young green pine cones (soft, 1–3 cm; picked in late spring/early summer)
- 700 g white sugar (you can blend white + light brown for deeper flavor)
- 500 ml water
- Optional: 1 lemon (sliced) or 1–2 tsp lemon juice (helps balance sweetness); 1 small piece vanilla bean or cinnamon stick for aroma
Gear:
- Large bowl, colander, cutting board, knife
- Non-reactive pot (stainless steel or enamel)
- Spoon, fine strainer/cheesecloth
- Clean, sterilized bottles or jars with lids
- Kitchen scale (highly recommended)
How to Harvest & Prep Cones
- Choose the right cones:
Look for immature, green, soft cones you can cut through. Hard, brown, woody cones are past their prime for syrup. - Ethical picking:
Take a modest amount from multiple trees. Avoid protected areas. Get permission if needed. - Clean carefully:
Shake off insects/debris. Rinse briefly in cool water; pat dry. Don’t soak for long—aroma lives in the resin.
Method 1: Quick Stovetop Syrup (Ready the Same Day)
This is the easiest way for beginners.
- Cut or halve the cones (optional):
If they’re small and very soft, leave whole. Otherwise, halving exposes more surface and speeds extraction. - Simmer the cones:
Add cones and 500 ml water to the pot. Bring to a gentle simmer (not a roaring boil) for 30–40 minutes, partially covered.- Aim to soften the cones and perfume the water; it should turn golden to amber.
- Strain the pine “tea”:
Remove from heat. Strain through a fine sieve or cheesecloth to get a clear, fragrant liquid. Discard cones. - Make the syrup:
Return the liquid to the pot, add 700 g sugar (and lemon slices or juice if using). Stir to dissolve over low heat.- Simmer 10–15 minutes, skimming foam. If you have a thermometer, heat to 103–105 °C (syrup stage).
- The syrup will thicken a bit more as it cools.
- Bottle safely:
Funnel hot syrup into sterilized warm jars/bottles, leaving ~1 cm headspace. Seal.- Let cool at room temp; then store in a cool, dark place.
Yield & texture: About 600–800 ml of pourable, amber syrup with a resin-honey aroma.
Method 2: Slow Sun-Macerated Syrup (Deeper Flavor)
This traditional approach takes time but rewards you with a more complex, slightly caramelized profile.
- Layer & sugar (cold extraction):
In a clean jar, layer clean, dry green cones with sugar in a 1:1 ratio by weight (e.g., 500 g cones + 500 g sugar). End with a sugar layer.- Optional: a few lemon slices between layers.
- Sun the jar:
Seal and place on a sunny windowsill for 2–6 weeks.- Sugar dissolves, drawing out resin and juices; the mix turns syrupy and darkens.
- Strain & finish:
Strain the thick syrup through cheesecloth. To stabilize, gently heat 5–10 minutes (optional but recommended), then bottle in sterilized jars.
Pros: Deeper flavor, perfume.
Cons: Takes weeks, requires patience.
Variations
- Honey-Based Version:
Swap sugar for mild honey in Method 2 (sun maceration). Do not cook honey; just macerate and keep refrigerated. Never give honey to children under 1 year. - Spiced Syrup:
Add vanilla, cinnamon, or a few juniper berries during the simmer; strain out before bottling. - Citrus Lift:
Lemon or orange peel (no pith) makes the flavor brighter.
How to Use Pine Cone Syrup
- By the spoon: 1–2 teaspoons as an occasional throat soother.
- Warm drinks: Stir into tea or hot water with lemon. Great in black tea, herbal blends, or even warm milk.
- Breakfast: Drizzle over pancakes, waffles, yogurt, granola, or porridge.
- Desserts: Brush on cakes as a soak, swirl into ice cream, or glaze baked apples/pears.
- Savory glazes: Mix with a splash of vinegar or soy to glaze roast veggies, grilled meats, or baked salmon.
- Salad dressings: Whisk with olive oil, vinegar, salt, and mustard for a forest-fragrant vinaigrette.
- Cocktails & mocktails: Replace simple syrup in Old Fashioneds, sours, or spritzers; adds a woodland note.
Typical “home remedy” serving: 1–2 tsp up to 3×/day when needed, or simply use culinary-style as you like.
Storage & Shelf Life
- Stovetop sugar syrup:
Sealed and stored cool/dark, it keeps 6–12 months. Once opened, refrigerate and use within 2–3 months. - Sun-macerated or honey version:
Keep refrigerated. Use within 2–3 months. - Spoilage signs: Mold, fizzing, off smells—discard if any appear.
Sterilizing jars (quick recap): Wash in hot soapy water, rinse, then heat jars (100–110 °C) for ~10 minutes in oven; boil lids 5 minutes; fill jars while hot.
Troubleshooting (Newbie Lifesaver)
- Too runny: Simmer a few minutes longer (aim for 103–105 °C). Remember it thickens as it cools.
- Too thick/crystallized: Stir in a little hot water and re-warm gently to dissolve crystals.
- Cloudy syrup: Usually harmless; fine-filter through cheesecloth.
- Bitter taste: Cones may have been too mature or over-simmered. Balance with a touch more lemon or a pinch of salt.
- Very dark syrup: Normal for long macerations; flavor is deeper and slightly caramelized.
Safety & Common-Sense Notes
- Allergies/asthma: Pine aromatics can be irritating for some. Start with a small amount.
- Pregnancy/breastfeeding & medical conditions: Check with a professional before regular use.
- Diabetes/low-sugar diets: This is a sugary product—use sparingly or consult a professional.
- Kids: Avoid honey versions under age 1. For sugary syrups, keep portions small.
- Identification matters: Use true pines (Pinus). Avoid yew and unknown conifers.
Quick Reference (Cheat Sheet)
- Best cones: Tiny, soft, green; cuttable with a knife.
- Fast method ratio: ~500 ml water + 700 g sugar per 500 g cones.
- Simmer time: 30–40 min (cones in water), then 10–15 min (with sugar).
- Temp target: 103–105 °C for syrup stage.
- Storage: Cool/dark sealed 6–12 months (sugar syrup); refrigerate after opening.
Final Word
Pine cone syrup brings the forest to your spoon—comforting in a cup of hot tea, exciting on a dessert plate, and beloved in many homes for generations. Start with the quick stovetop method for guaranteed success, then try the slow sun-macerated version when you’re ready to level up. Happy syrup-making!
Inspired by this? Share the article with your friends!