🌼 The Lost Art of the Dandelion Crown: A Step-by-Step Guide 🌼
We’ve all seen these whimsical crowns, but do you actually know how to make one that stays together? I found this incredible guide that breaks down the “secret” weaving technique perfectly. Whether you’re celebrating Pride, enjoying a sunny day at the park, or just want to channel your inner forest fairy, here is the real tested method to making a flower crown that won’t fall apart.
🌿 WHAT YOU NEED:
Dandelions (or Daisies/Clover): Look for ones with long, thick, flexible stems.
Patience: It takes about 5 minutes to get the rhythm!
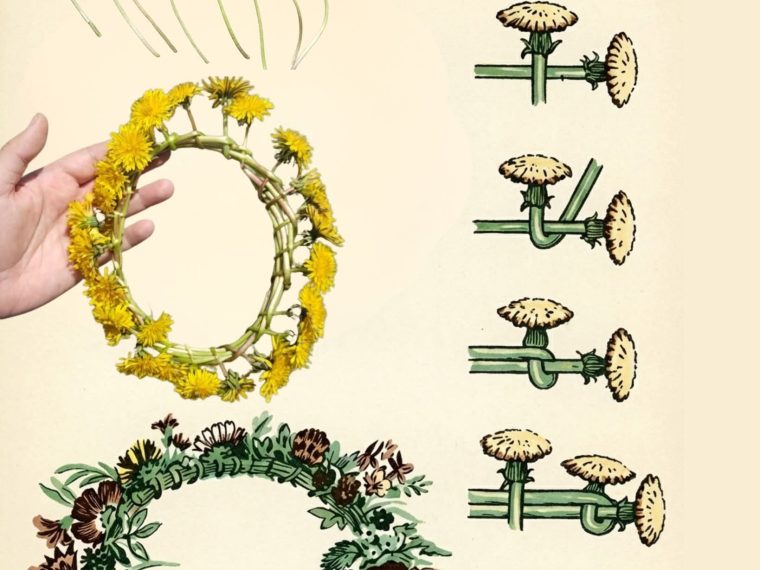
🛠 THE TECHNIQUE (The “Loop & Lock”): Based on the vintage diagram below, here is the fail-safe method:
The Base: Start with two flowers. Hold one stem horizontally (this is your “base” stem).
The Placement: Take the second flower and place it vertically behind the flower head of the first one.
The Loop (The Critical Step): Take the stem of the second flower, wrap it over the top of the first stem, then loop it underneath and pull it through to the back.
The Lock: Pull the stem tight so it lays horizontally alongside the first stem. Now you have a bundle of two stems.
Repeat: Place the next flower vertically behind the bundle, wrap over and under, and pull the stem flat to join the growing bundle.
The Finish: Once it’s long enough to fit your head, bring the two ends together. You can use a piece of grass, string, or a final flower stem to tie the loop closed.
✨ PRO-TIPS FOR SUCCESS:
Pick Fresh: Dandelions wilt fast! Make these fresh on the spot for the best look.
Watch the Sap: Dandelion stems have a milky white sap that can stain hands and clothes slightly brown—totally worth it, but don’t wear your best white silk dress while making one!
Keep it Tight: Keep your thumb on the “knot” as you add each new flower to keep the chain from getting loose.
Save this image so you don’t forget the weaving pattern next time you’re outside! 👇