🌿 Weekend DIY: Create a Mini Wildlife Pond Oasis! 🐸
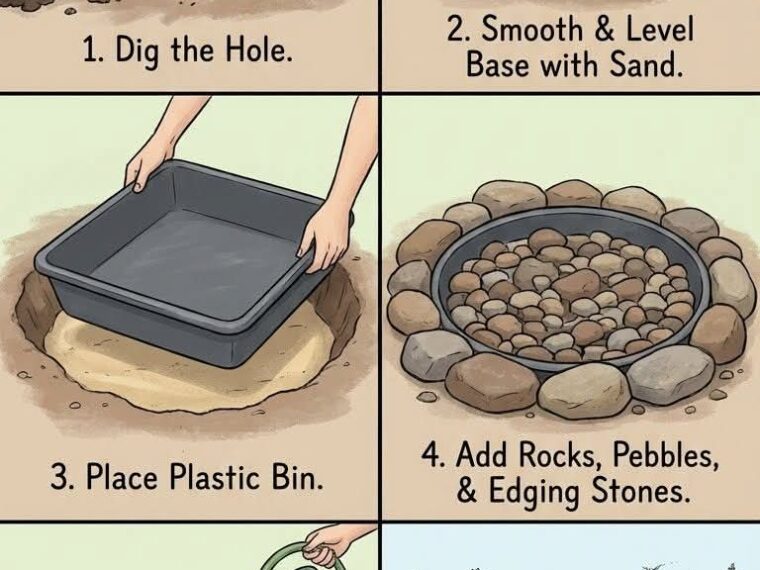
Want a weekend project that genuinely helps local nature? With this simple approach (inspired by the method shown in the image), you can build your own Micro Wildlife Pond—no fancy liners or expensive kits needed.
This “Container Pond Method” is budget-friendly, beginner-proof, and perfect for small outdoor spaces, patios, or rented homes.
Below is the complete step-by-step guide, including the expert tips you never see in basic diagrams.
🛠️ What You’ll Need
A tough plastic storage tub or bin
Pro Tip: Choose a heavy-duty one—thin containers can split when temperatures drop. Old sinks or basins work brilliantly too!
Shovel and spade
Builder’s sand or play sand
A selection of rocks, gravel, and a couple of larger stones
Native pond plants (important for healthy water)
📋 Step-by-Step Instructions (Tried & Tested)
1️⃣ Mark Out & Dig
Place your container upside down on the ground and trace around it. Dig a hole that’s a touch deeper and wider.
⚠️ Be cautious about buried utilities—check before you dig!
💡 Keep the turf you remove—you’ll use it to neaten the edges later.
2️⃣ Add a Sand Cushion (Don’t Skip This!)
Spread a 3–5 cm layer of sand across the bottom of your hole.
This protects the container from sharp stones and helps you position it level.
Use a spirit level here—an uneven pond means a wonky waterline.
3️⃣ Fit the Container & Backfill
Lower your tub into the hole so the rim sits just below ground level.
The Gentle Wiggle Test: stand lightly inside the container to settle it into the sand.
Fill the gap around the outside with loose soil or sand. Pack it firmly—this prevents the container from bowing outward once filled with water.
4️⃣ Build an Escape Route (Essential for Wildlife!)
Smooth plastic sides are impossible for small animals to climb. To avoid accidental drownings:
Create a ramp inside the pond using bricks, rocks, or stacked stones.
Ensure the top stones sit at the water surface so animals can exit and birds can safely drink.
This single step turns your pond from a water feature into genuine wildlife habitat.
5️⃣ Fill with the Right Water
Add water to your new pond:
✔ Best option: rainwater from a water butt—low nutrients, wildlife-friendly.
✔ Acceptable: tap water—but let it stand for 24–48 hours first to allow chlorine to evaporate, protecting amphibian skin.
6️⃣ Add Plants for a Balanced Pond
Plants are crucial—they prevent algae blooms and create microhabitats.
Oxygenators (e.g., hornwort) → submerged to keep water healthy
Marginals (e.g., marsh marigold) → placed on small shelves or bricks
Floating plants (e.g., frogbit) → provide shade and reduce algae growth
Aim for a mix—your pond will settle much faster.
🐞 What Wildlife Will Visit?
Once your pond is established, expect nature to arrive surprisingly quickly:
Dragonflies and damselflies will hover and lay eggs
Birds will drink and bathe
Frogs, toads, and newts may use it for shelter or spawning
Countless insects will move in and support the food chain
It’s a full mini-ecosystem—all inside a simple container!
📸 Save this guide for your next weekend project—your garden wildlife will thank you!